Building a smart Chatbot with ClaudiaJS, Watson NLP and AWS
There are already many examples on how to quickly develop a chatbot with AWS Lambda and API Gateway (see here and here). However, most of them don’t go much further than replying to a few well defined commands. If you want to compete in the brave new bot world, your bot needs to be more than just a new command line interface. It needs to understand human language (NLP) and it needs to be able to have conversations (state, memory). This post shows how to integrate with Watson Conversation and AWS DynamoDB to give your bot natural language understanding and a memory.
Let’s get started
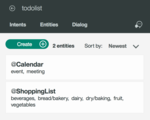
We’re going to build a prototype for a bot that manages to-do lists. The bot should be able to understand when the user wants to add something to a list. We further want to differentiate between things to add to the shopping list and things to add to the calendar. A message such as ‘cancel’ or ‘that’s wrong’ should cancel the last action.
This article starts where the ClaudiaJS “Hello World” example left off. If you haven’t done so, head over to their getting started guide and check out the example repository. By now, you should have a very simple chatbot up and running replying with random excuses to your every message.
NLP and machine learning with Watson Conversation
The first thing that we want to do is make our bot understand us better. For this, we’re going to integrate with Watson Conversation. There’s a free developer plan, so you can easily sign up and create your first workspace. After creating a new workspace, you can set up intends, entities and dialogs via the web interface or JSON Api.
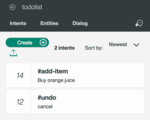
Your bot uses intends and examples to figure out the purpose of a user’s message. For our to-do list prototype, I built two intends: #add-item adds something to a list. #undo removes the last item from the list. Make sure to fill in a good amount if examples, because this is part of your bots training.


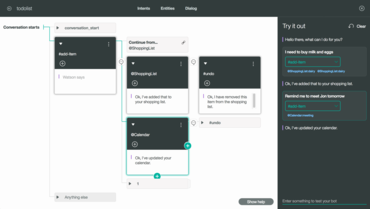
Finally, the dialog setup helps Watson to understand a typical conversation flow. The conversation_start node allows us to specify a welcome message. The #add-item node gets triggered when Watson thinks that the user’s intend is to add an item. If that’s the case, then we let Watson further interpret the user input to either add something to the shopping list, the calendar or a general to-do list. In case the user changed their mind, we add the #undo node. Finally, when all else fails and Watson can’t interpret the intend, the Anything else node is invoked.

When you click the little message box in the dialog view, a chat window opens. You can test and train your bot from there and see how Watson identifies your input. If Watson’s interpretation of you message is wrong, you can provide it with the correct intend. This way your bot can learn and improve.
Ok, time to integrate Watson Conversation into our ClaudiaJS based chatbot. You will need to create an API user with a password. (Note that this is not the user you use to log in to Bluemix or the Watson UI, it’s credentials managed under Service Credentials in your Bluemix dashboard). Other than that you also need your workspace ID at hand (you’ll find this for example in the URL of the Watson conversation UI).
Finally, some code: Add a dependency to the “watson-developer-cloud” to your node chatbot project and see the following code to invoke the Watson conversation service. Replace your-workspace-id, your-username and your-password accordingly.
1
2
3
4
5
6
7
8
9
10
11
12
13
14
15
16
17
18
19
20
21
22
23
24
25
26
27
28
29
30
31
32
33
34
35
36
37
38
'use strict';

const botBuilder = require('claudia-bot-builder');
const watson = require ( 'watson-developer-cloud' );

const DEFAULT_ERR_REPLY = 'Sorry, I\'m taking a break right now. Please come back later.';

const WORKSPACE_ID = 'your-workspace-id';
var conversation = watson.conversation ( {
  username: 'your-username',
  password: 'your-password',
  version_date: '2016-07-01',
  version: 'v1'
} );

module.exports = botBuilder(request => {

    console.log('Request:', request)

    var payload = {
      workspace_id: WORKSPACE_ID,
      input: {
        text: request.text
      },
      context: {}
    };

    conversation.message (payload, function (err, data) {

        if (err) {
          console.error('Error:', JSON.stringify(error));
          return DEFAULT_ERR_REPLY;
        }

        console.log('Response:', JSON.stringify(data));
        return data.output.text;
    });
});
The code is really straight-forward. We construct a payload object with the workspace id and the user’s input text and send it off to to the Watson Conversation API. We then send the output text from Watson as the reply to the user. In case of any errors, we log the error details and return a standard error message to the user.
Persistent context with AWS Dynamo DB
If you’ve followed the example until here, you will have noticed that unlike the preview functionality in Watson, our chatbot always starts the conversation from the beginning. You might have guessed already that this is because we always provide an empty context to Watson. To change this, we need to give our bot a memory. It needs to remember where previous conversations have left off, so that it can resume. Our AWS Lambda function is stateless, so we need to store the state externally. There are plenty of options. For example, we could use AWS Elasticache (Memcached for short-lived conversations or Redis for persisted long term conversations). Here, I chose AWS DynamoDB because of its durability and ease of use.
1
2
3
4
5
6
7
8
9
10
11
12
13
14
15
16
17
18
19
20
21
22
23
24
25
26
27
28
29
30
31
32
33
34
35
36
37
38
39
40
41
42
43
44
45
46
47
48
49
50
51
52
53
54
55
56
57
58
59
60
61
62
63
64
65
66
67
68
69
70
71
72
73
74
75
76
77
78
79
80
81
82
83
84
85
86
87
88
89
90
91
92
93
94
95
'use strict';

const botBuilder = require('claudia-bot-builder');
const watson = require ( 'watson-developer-cloud' );
const Q = require('q');
var AWS = require('aws-sdk');
const dynamodb = new AWS.DynamoDB.DocumentClient();
AWS.config.setPromisesDependency(Q.Promise);

const DEFAULT_ERR_REPLY = 'Sorry, I\'m taking a break right now. Please come back later.';

const WORKSPACE_ID = 'your-workspace-id';
var conversation = watson.conversation ( {
  username: 'your-username',
  password: 'your-password',
  version_date: '2016-07-01',
  version: 'v1'
} );

var AWS = require('aws-sdk');
const dynamodb = new AWS.DynamoDB.DocumentClient();

AWS.config.setPromisesDependency(Q.Promise);

const CTX_TBL_NAME = 'chatbot-todolist-ctx';

// restore conversation context from dynamodb
function restoreCtx(sender)
{
  console.log("Trying to restore context for sender", sender);

  var params = {
    TableName: CTX_TBL_NAME,
    Key: {
      's': sender
    }
  };

  return dynamodb.get(params).promise();
}

// persist context to dynamodb
function persistCtx(sender, context)
{
  console.log("Persisting context for sender", sender);

  var params = {
      TableName: CTX_TBL_NAME,
      Item:{
          's': sender,
          'x': context
      }
  };

  return dynamodb.put(params).promise();
}

module.exports = botBuilder(request => {

  console.log('Request:', request)

  // we're going to store the context under this key
  var sender = request.type + '.' + request.sender ;

  return restoreCtx(sender).then(function(existingCtx) {

    var context = {};
    if (existingCtx.Item) {
      context = existingCtx.Item.x; // we have a previously stored context
    }

    var payload = {
      workspace_id: workspace_id,
      input: {
        text: request.text
      },
      context: context // pass it in to watson
    };

    return sendMessageToWatson(payload) // not shown here, but very similar to the first code example
    .then(function (data) {
      console.log('Response:', JSON.stringify(data));

      // persist the updated context, then reply to the user
      return persistCtx(sender, data.context)
      .then(function(result) {
        return data.output.text;
      });
    })
  })
  .catch(function (error) {
    console.error('Error:', JSON.stringify(error));
    return DEFAULT_ERR_REPLY;
  });
});
The code above should be easy to follow. I’ve added two functions: restoreCtx attempts to load a previous context and persistCtx saves the updated context. Now we restore the user’s context at the beginning of the request if available and we save it at the end of each request with the updated values from Watson. More specifically, we store a context for each sender id. To avoid id clashes between different message channels, we also include the type (message channel) as part of the primary key. Now all that’s left is to crate a new table ‘chatbot-todolist-ctx’ in DynamoDB. The partition (hash) key is named ‘s’; there is no sort key. We simply store the context object returned from the Watson API in column ‘x’.
Conclusion
APIs are awesome! By leveraging the Watson conversation API our bot is now able to understand basic human language and can identify the user’s intend. Furthermore we are able to define a basic dialog flow, allowing for real conversations rather than just simple commands. This requires state management, which we have implemented by using AWS DynamoDB.
From here, we probably want to spend a lot of time training our bot to make it smarter. Also we only pretended to add something to a to-do list. The next step would be to integrate with a to-do list service. Maybe this is something for another blog post.